

Access your FREE Solopreneur Success Hub - your subscribers-only comprehensive command center for building and scaling a successful one-person business.
I created this all-in-one toolkit for building a profitable one-person business, something I wish existed when I first started, and it saves me 20+ hours a week.
Now, it’s yours… FREE!
More information about the Hub here.
This guide teaches you how to write effective prompts for Nano Banana Pro, Google’s advanced image generation model.
Learn to structure your prompts like a cinematographer or art director by defining core ideas, using detail buckets (lighting, mood, camera angles), leveraging camera language, and specifying text rendering requirements.
Master techniques for creating consistent characters, designing UI mockups, generating posters, and iterating with precision through conversational editing.

Core principles
Nano Banana Pro is built to reason about structure, lighting, text, and composition, so the more you think like a cinematographer or art director, the more control you get.
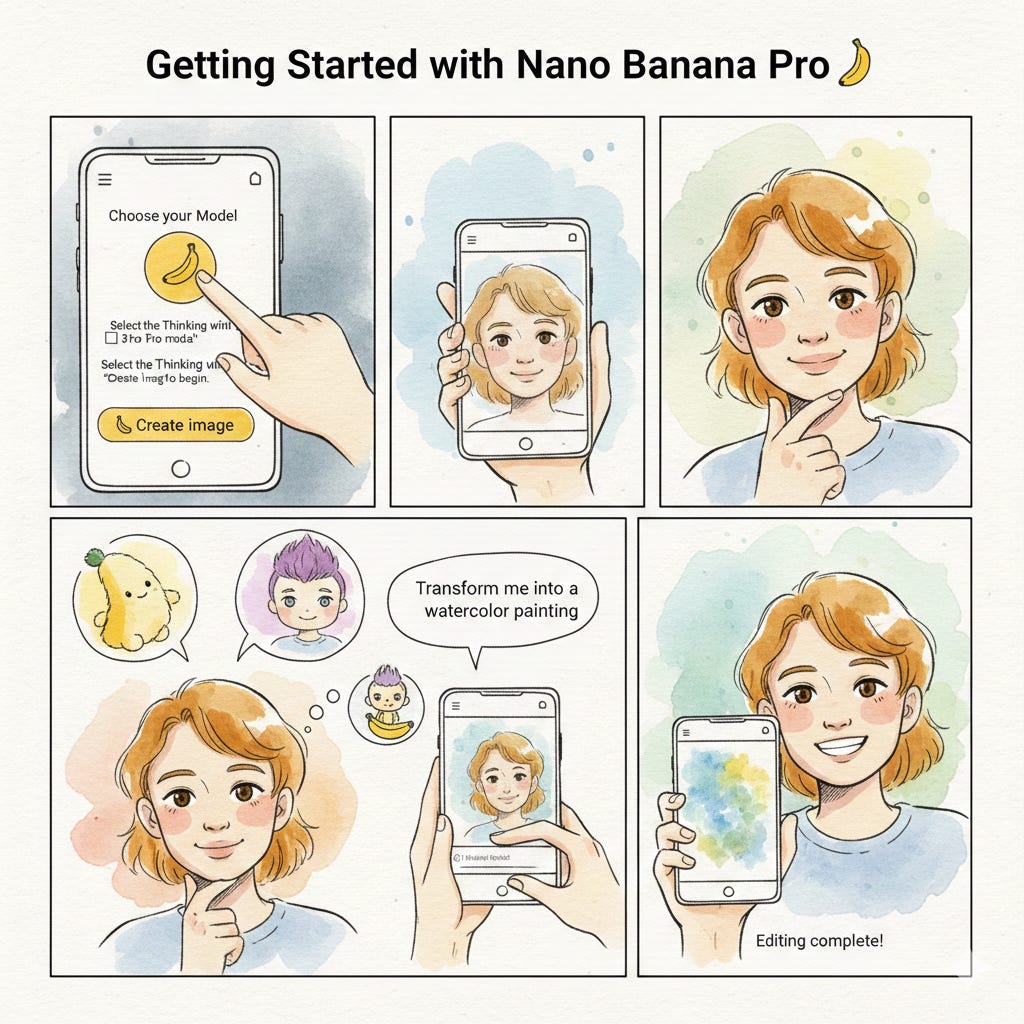
Treat every prompt as a short creative brief:
Define the idea, then layer in context, details, and constraints instead of dumping buzzwords.
Step 1: Core idea (anchor)
Start every prompt with a single, simple sentence that captures the essence of the scene.
Formula: “a [high-level description of subject/scene]”
Example: “a futuristic living room at night”
This “core idea” gives the model a strong anchor so later details refine, instead of derail, the image.
Example for Step 1
Here’s a prompt that demonstrates Step 1 - starting with a clear, simple core idea:
“A weathered lighthouse keeper at sunrise”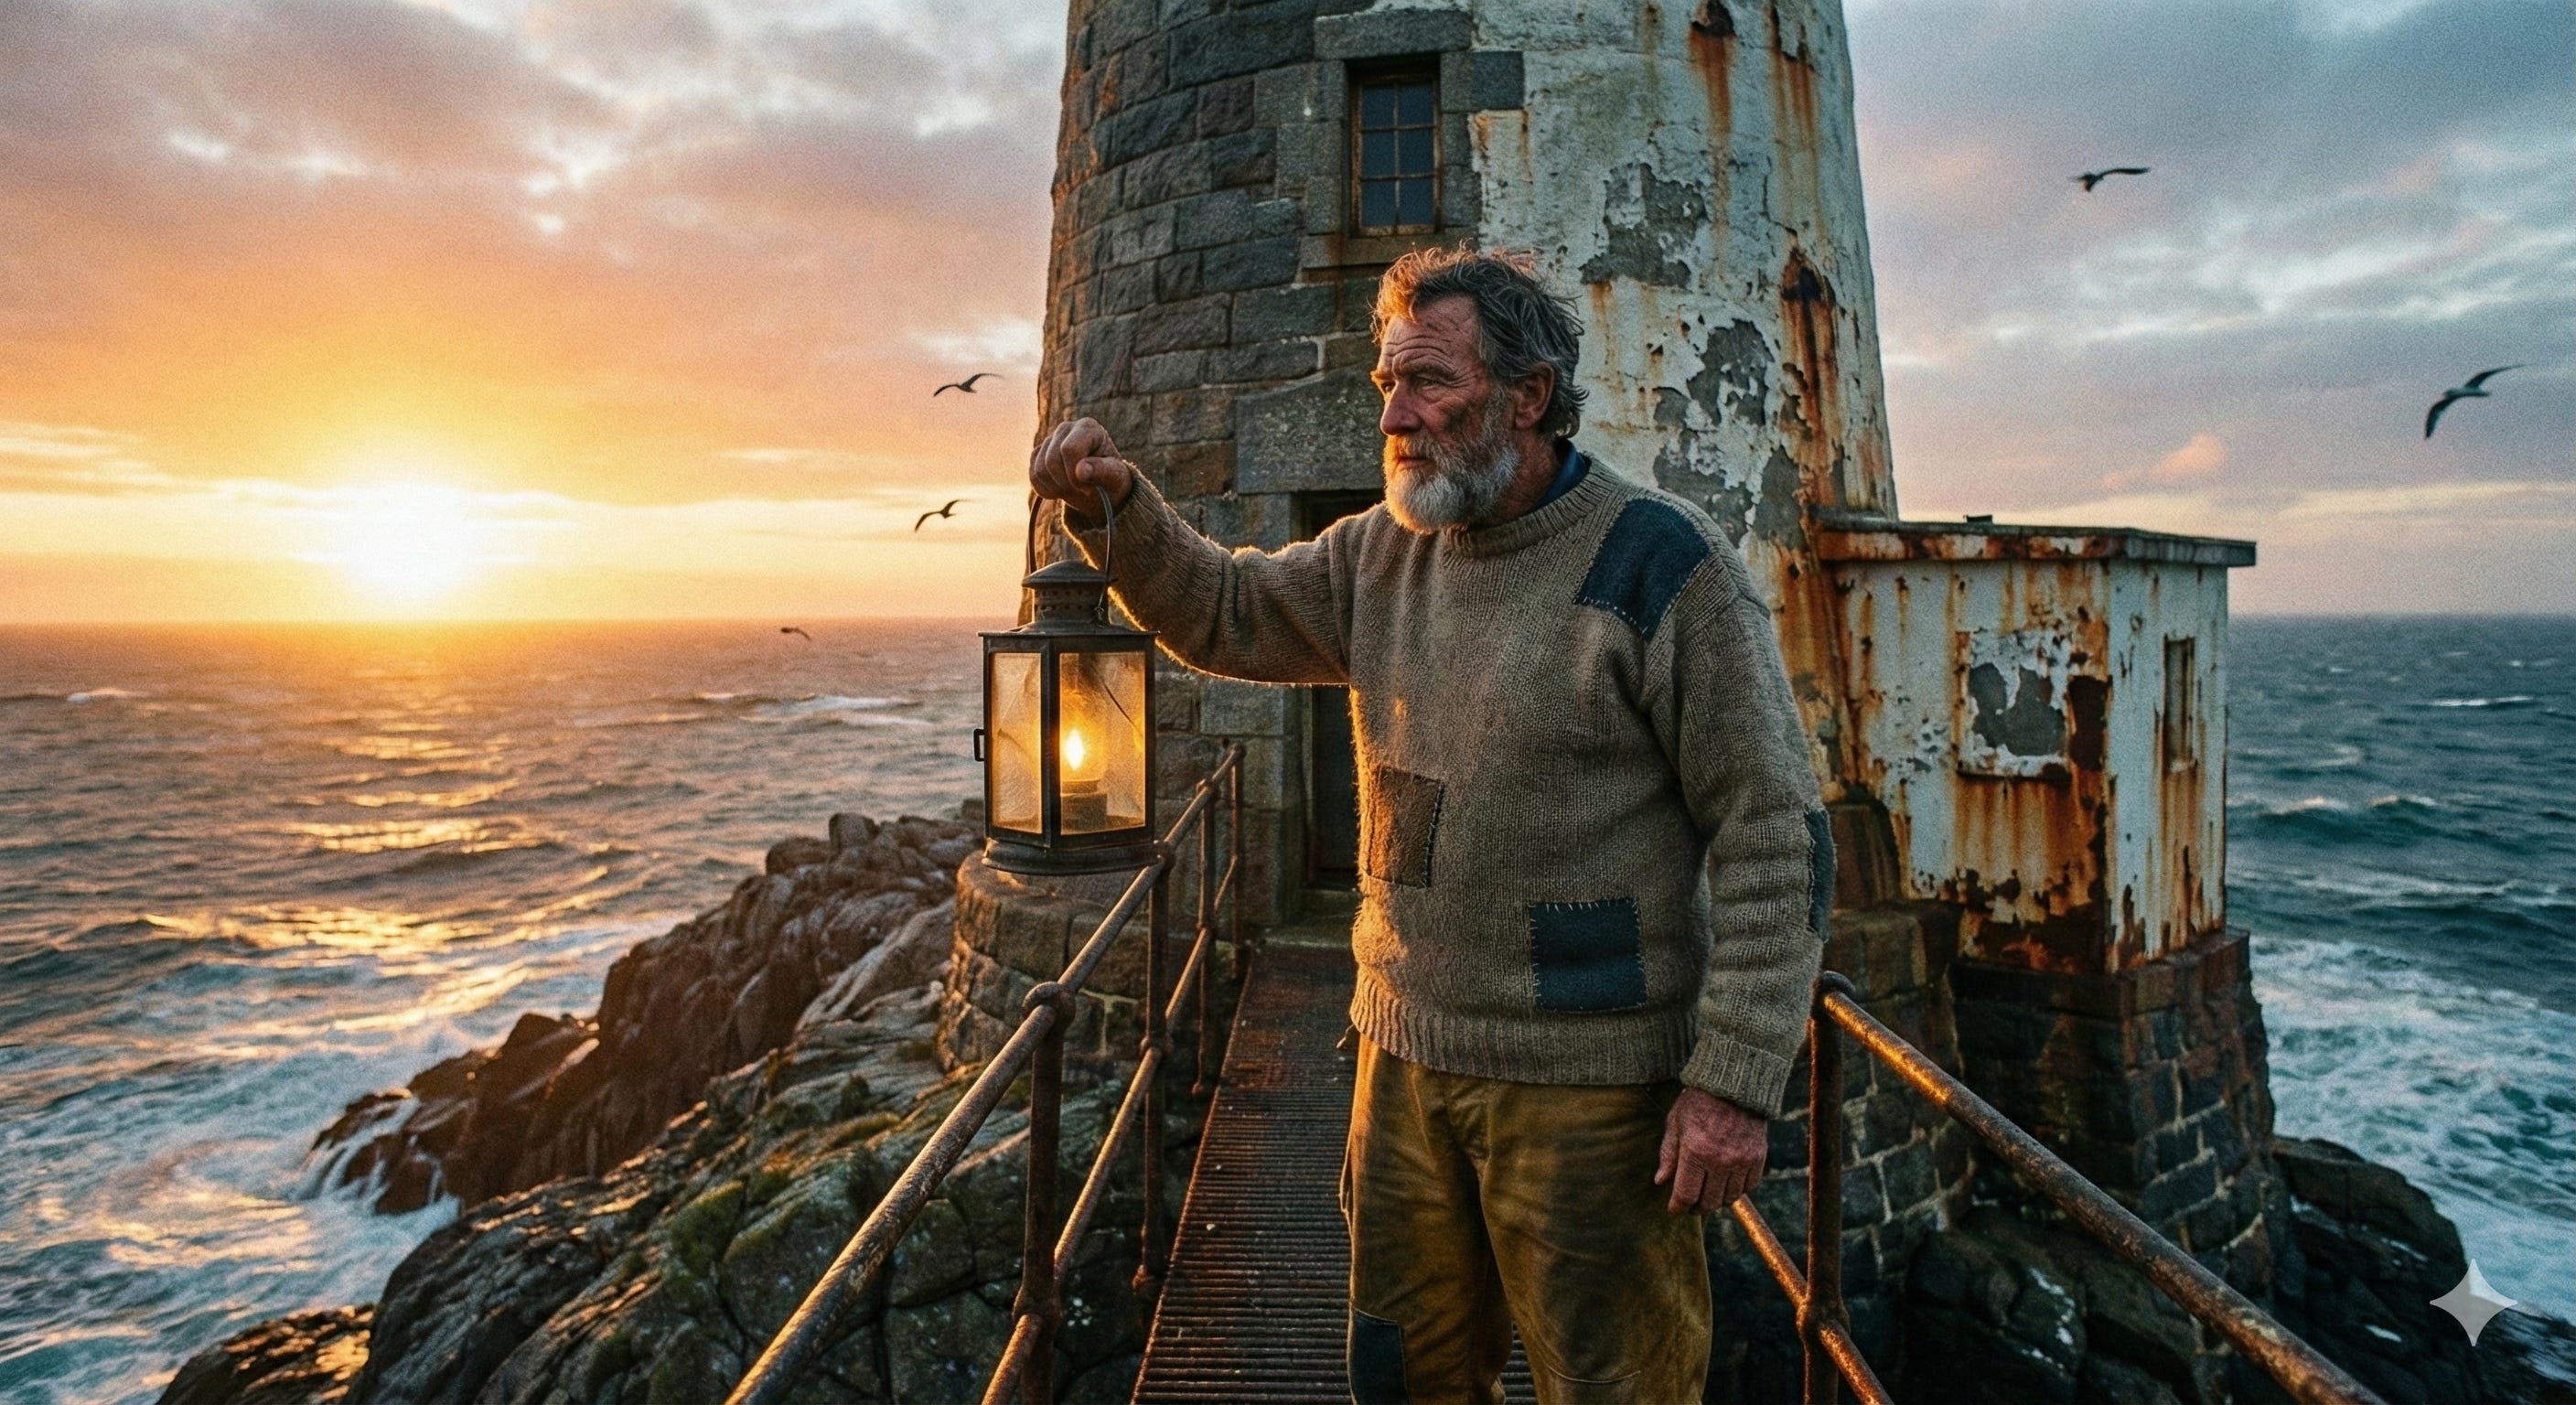
This single sentence captures the essence of the scene and gives Nano Banana Pro a strong anchor point.
From here, you could build out the other steps by adding who/what/where details, lighting, mood, camera settings, and style, but the core idea stays focused and simple.
Other examples following the formula “a [high-level description of subject/scene]”:
“A vintage bookstore in autumn rain”
“A street musician performing in a subway station”
“A chef plating a dish in a busy kitchen”
Each one is concrete enough to anchor the image, but open enough that later details can refine it without creating confusion.
Step 2: Who, what, where
Add a second layer that answers three questions:
Who/what is the subject?
What are they doing?
Where are they?
Example: “a futuristic living room at night, neon reflections on glass walls, a single orange reading lamp, rain outside the window”
This context prevents generic outputs and tells Nano Banana Pro what the scene is actually about.
Example for Step 2
Here’s a prompt demonstrating Step 2 that builds on the lighthouse keeper example from Step 1:
Core idea (Step 1):

“A weathered lighthouse keeper at sunrise”

Adding Step 2 (Who, what, where):

“A weathered lighthouse keeper at sunrise, an elderly man with a white beard adjusting the lens mechanism inside the lantern room, surrounded by brass fittings and curved glass windows overlooking a rocky coastline”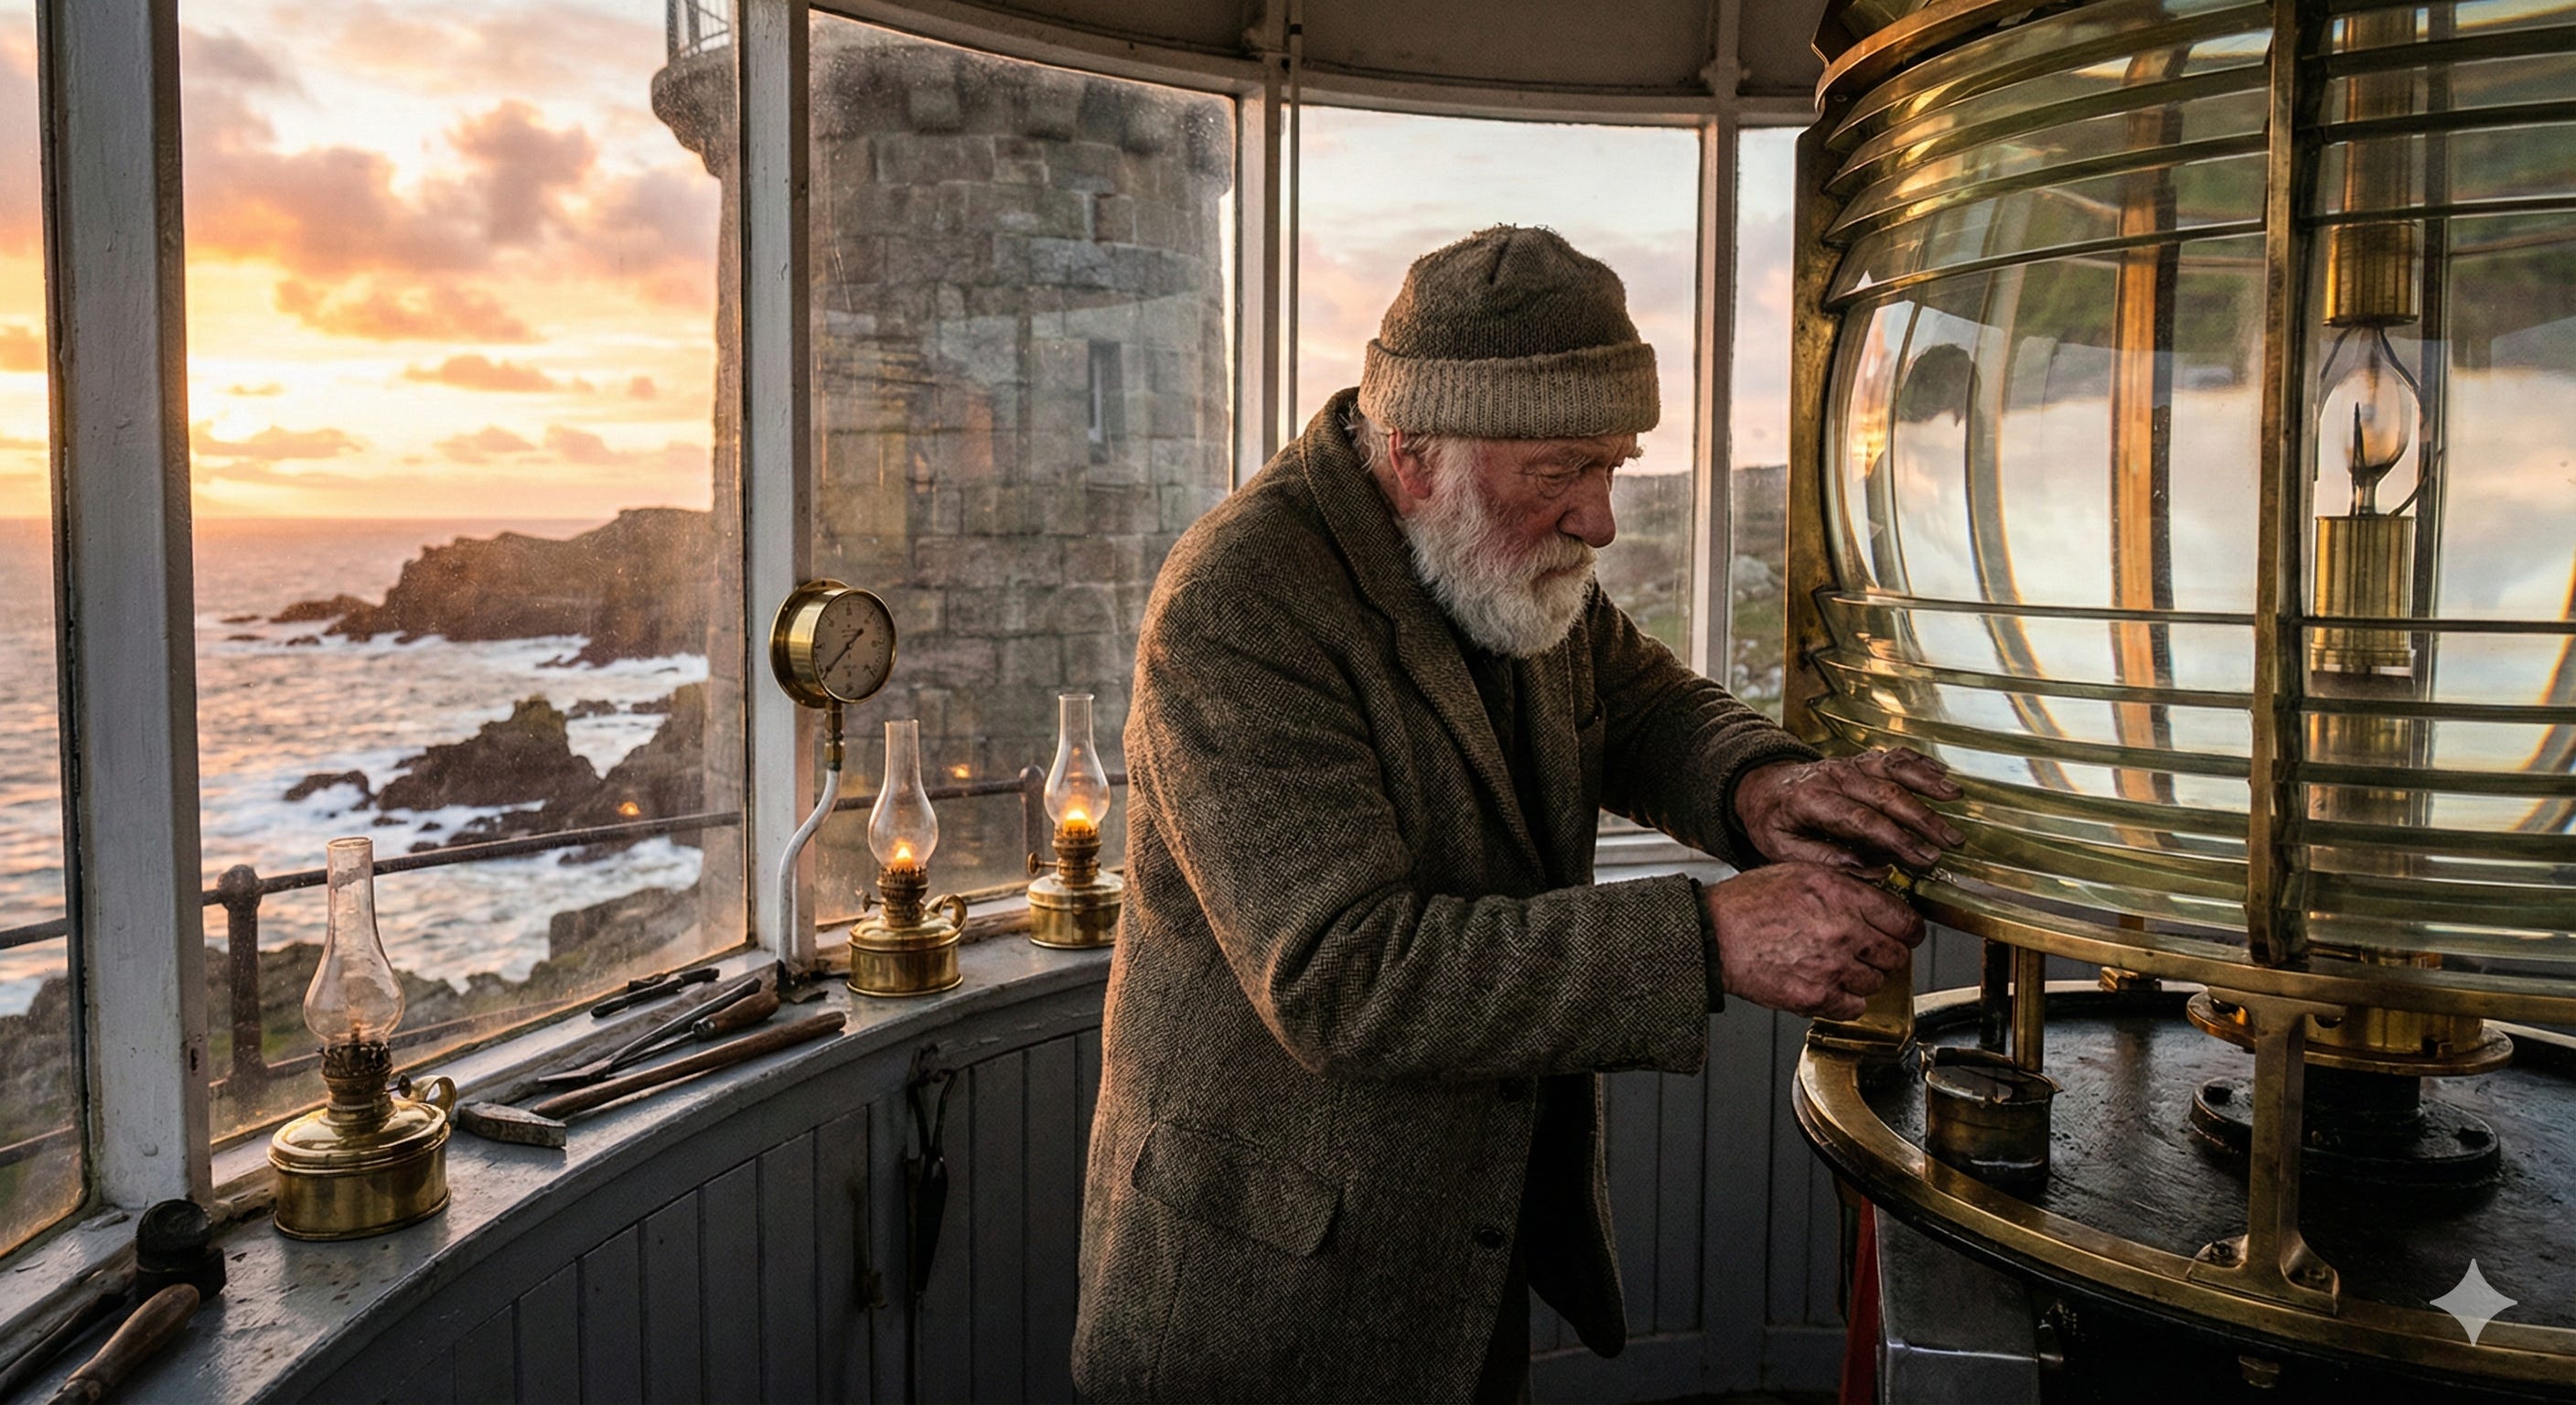
This answers the three key questions:
Who/what is the subject? An elderly man with a white beard
What are they doing? Adjusting the lens mechanism
Where are they? Inside the lantern room with brass fittings, curved glass windows, overlooking a rocky coastline
The added context prevents generic outputs and tells Nano Banana Pro what the scene is actually about, transforming a vague concept into a specific, ‘visualizable’ moment.
Step 3: Detail buckets system
Instead of a random adjectives dump, separate your details into buckets:
Lighting
Mood
Environment
Camera
Color
Textures
Composition
Here are examples for each detail bucket:
Lighting:
“soft neon purple and blue, subtle reflections on glass”
“golden hour sunlight streaming through curved glass, warm amber glow mixing with cool blue shadows”
“overhead industrial pendant lights mixing with warm under-cabinet LED strips”
“harsh fluorescent overhead, casting deep shadows under eyes”
“volumetric lighting through window blinds, god beams creating atmosphere”
Mood:
“calm, meditative, late-night focus”
“quiet determination, peaceful solitude, nostalgic reverence”
“intense concentration, professional artistry, controlled chaos”
“tense anticipation, uneasy silence”
“playful energy, carefree joy”
Environment:
“minimalist furniture, tall glass windows, rain streaks outside”
“polished brass fixtures with patina, worn wooden floorboards, nautical charts on wall”
“professional kitchen with stainless steel surfaces, white tile walls, copper cookware”
“cluttered desk with scattered papers, vintage typewriter, coffee-stained mug”
“abandoned warehouse with exposed brick, broken windows, graffiti-covered walls”
Camera:
“50mm lens, eye-level shot, shallow depth of field”
“85mm lens, f1.4, low angle from plate level looking up”
“35mm film, wide establishing shot, deep focus”
“macro close-up, 100mm, background compressed in creamy bokeh”
“anamorphic lens, over-the-shoulder shot, cinematic widescreen”
Color:
“warm gold and amber from sunrise, cool steel blue from ocean”
“warm amber kitchen lights, cool stainless steel, vibrant green microgreens”
“muted earth tones, desaturated greens and browns”
“high contrast black and white with pops of red”
“pastel pinks and purples, soft lavender hues”
Textures:
“rough weathered hands, smooth polished brass, grainy worn wood”
“glossy sauce on plate, crisp microgreens, brushed stainless steel”
“soft velvet fabric, cold marble surface, rough concrete”
“cracked leather, tarnished metal, splintered wood”
“smooth silk, fluffy cotton, reflective glass”
Composition:
“subject seated in lower right third, city skyline blurred in background”
“subject positioned in left third of frame, focal point in center, horizon in background following rule of thirds”
“plate positioned in lower third, hands as focal point in center, face in upper third”
“centered symmetrical framing, leading lines converging at vanishing point”
“diagonal composition from bottom left to top right, negative space in upper left”
Example bucket fill:
lighting: “soft neon purple and blue, subtle reflections on glass”
mood: “calm, meditative, late-night focus”
environment: “minimalist furniture, tall glass windows, rain streaks outside”
composition: “subject seated in lower right third, city skyline blurred in background”
This structure keeps prompts readable while giving the model precise guidance on every dimension of the image.
Example for Step 3
Here’s a prompt demonstrating Step 3 by building on the lighthouse keeper example from the earlier steps:
Core idea + Who/what/where (Steps 1-2):

“A weathered lighthouse keeper at sunrise, an elderly man with a white beard adjusting the lens mechanism inside the lantern room, surrounded by brass fittings and curved glass windows overlooking a rocky coastline”

Adding Step 3 (Detail buckets):

“A weathered lighthouse keeper at sunrise, an elderly man with a white beard adjusting the lens mechanism inside the lantern room, surrounded by brass fittings and curved glass windows overlooking a rocky coastline

lighting: golden hour sunlight streaming through the curved glass, warm amber glow mixing with cool blue shadows, light rays creating god beams through morning mist

mood: quiet determination, peaceful solitude, nostalgic reverence for maritime tradition

environment: polished brass fixtures with patina, worn wooden floorboards, nautical charts on the wall, oil lantern hanging from ceiling, thick glass panes with salt spray residue

camera: 50mm lens, eye-level shot from behind and slightly to the side, shallow depth of field focusing on hands adjusting the mechanism

color: warm gold and amber from sunrise, cool steel blue from ocean, weathered brass and bronze tones, cream-colored walls

textures: rough weathered hands, smooth polished brass, grainy worn wood, textured canvas work jacket, crystalline glass with water droplets

composition: subject positioned in left third of frame, lighthouse beam mechanism as focal point in center, ocean horizon visible through windows in background following rule of thirds”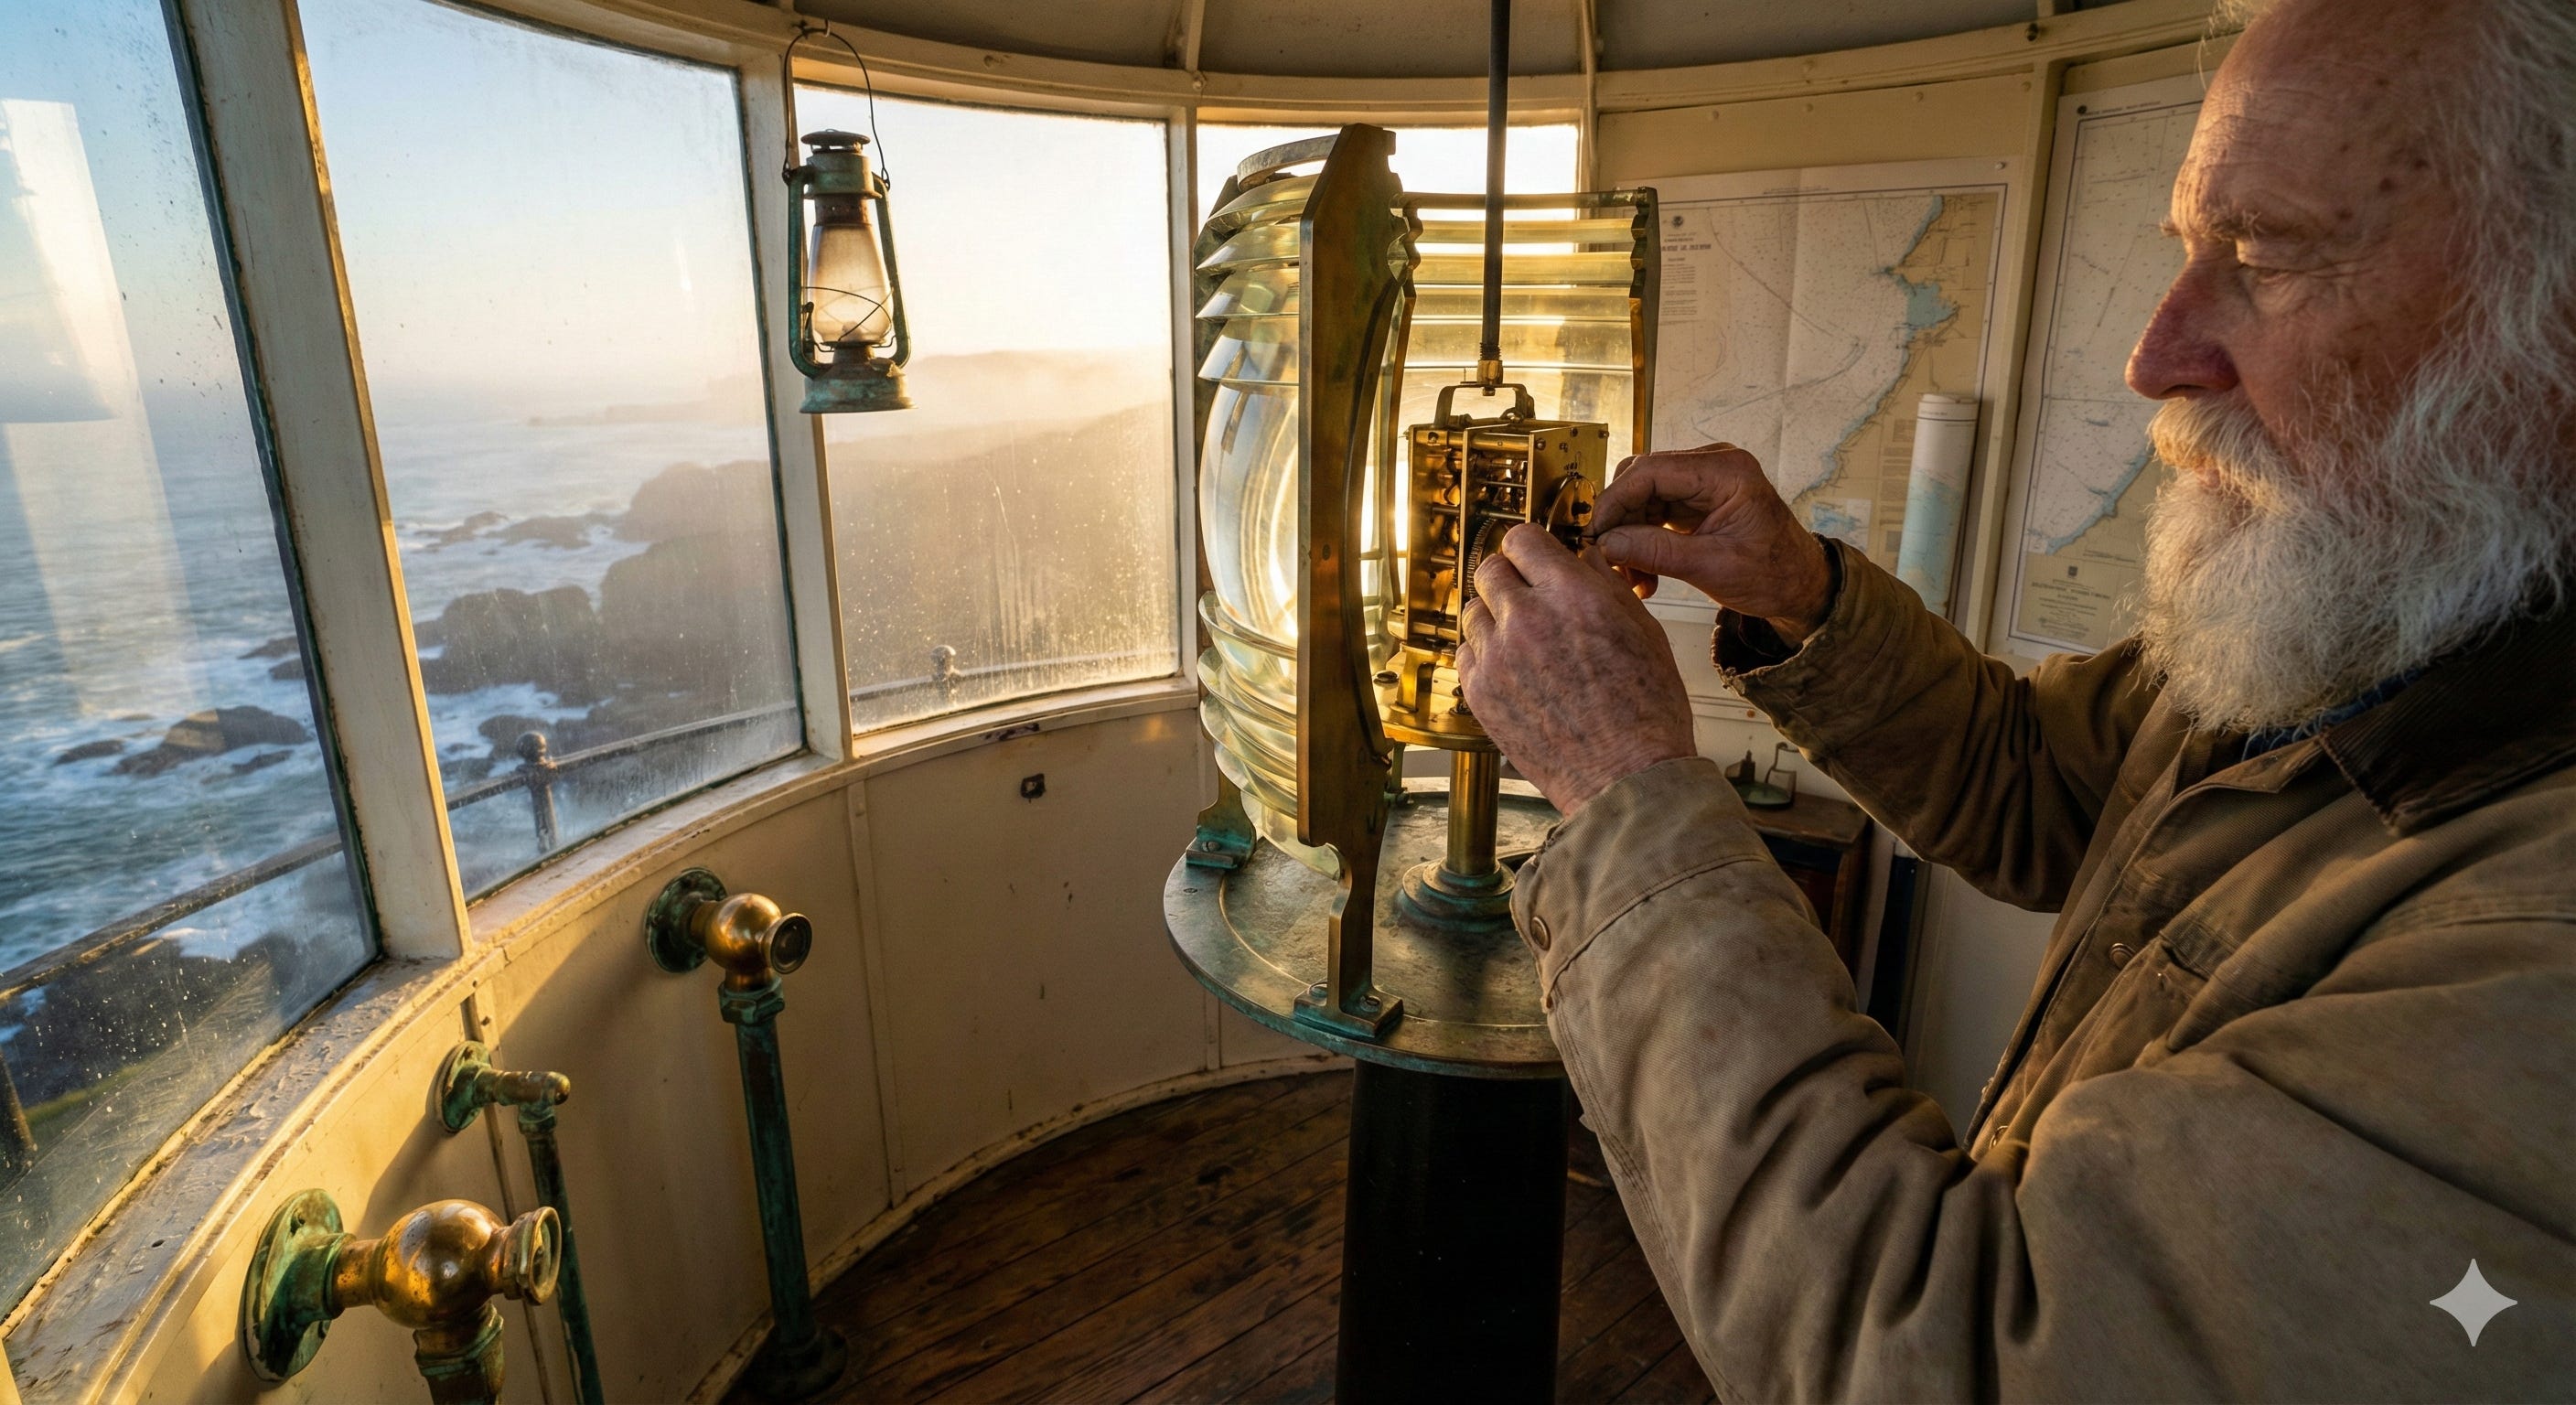
Notice how each bucket gives precise guidance on a different dimension of the image, making the prompt structured and readable rather than a random collection of adjectives.
Step 4: Camera brain hack
Nano Banana Pro responds especially well to camera language, so write like a Director of Photography:
Lenses: “35mm”, “50mm portrait”, “anamorphic lens”
Shots: “macro close-up”, “wide establishing shot”, “over-the-shoulder shot”
Depth: “f1.4 shallow depth of field”, “deep focus”
Motion/look: “motion blur”, “volumetric lighting”, “long exposure light trails”
Here are examples for each detail bucket:
Lenses:
24mm wide-angle lens: Captures a wider view than human vision. Best for landscapes, architecture, and expansive scenes. Creates space and depth but distorts edges, stretching or curving objects.
85mm portrait lens: Classic portrait focal length with natural compression and flattering face proportions. Perfect for headshots and isolating subjects with background blur.
100mm macro lens: For extreme close-ups at 1:1 magnification or greater, capturing tiny details like insects, jewelry, or textures. Very shallow depth of field at close distances.
Telephoto 200mm lens: Compresses perspective and magnifies distant subjects. Used for wildlife, sports, or when physical proximity isn’t possible. Creates heavily blurred backgrounds and makes distant elements appear closer together.
Fisheye 8mm lens: Ultra-wide lens with extreme barrel distortion and spherical effect. Captures nearly 180° view for dramatic, surreal images. Used for creative effects, action sports, planetarium shots, or immersive distorted perspectives.
Vintage anamorphic cinema lens: Anamorphic lenses capture widescreen images with distinctive cinematic characteristics: oval bokeh, horizontal lens flares, and unique distortion. They create the classic widescreen “movie” look with optical qualities digital processing cannot replicate.
Shots:
“extreme close-up on eyes”
“bird’s eye view shot from above”
“Dutch angle tilted shot”
“tracking shot following subject”
“two-shot framing both characters”
“point-of-view shot from character’s perspective”
Depth:
f16 deep focus landscape: Everything from near to far stays sharp. Great for landscapes where you want all details in focus.
f8 everything in focus: Similar to f16 but slightly less extreme. Common for general scenes where you want clarity throughout.
f2.8 medium depth of field: Subject is sharp, background starts to soften. Balanced look for portraits and product shots.
f1.4 shallow depth of field: Very blurred background, subject pops. Classic for portraits and isolating subjects.
f1.2 ultra-shallow with heavy bokeh: Extreme background blur with creamy, dreamy effect. Only a thin slice stays sharp.
Rack focus: Focus shifts during the shot—starts on one element, then moves to another. Creates dramatic transitions.
Tilt-shift miniature effect: Makes real scenes look like tiny toy models by blurring top and bottom while keeping middle sharp.
Motion/look:
“slow shutter motion blur on moving cars”
“lens flare from sun”
“chromatic aberration on edges”
“light painting with long exposure”
“star trails from night sky exposure”
“intentional camera movement blur”
Example: “shot on 35mm film, low angle, f1.4 shallow depth of field, volumetric lighting through the window blinds”
These cues dramatically change perspective, focus, and cinematic feel.
Example for Step 4
Here’s a prompt that demonstrates Step 4 by using camera language to control perspective, focus, and cinematic feel:
A chef plating a dish in a busy kitchen

An experienced chef with focused expression carefully placing microgreens on a gourmet dish, stainless steel counters and hanging copper pots visible in background, other kitchen staff moving in soft blur

lighting: overhead industrial pendant lights mixing with warm under-cabinet LED strips, steam catching backlight from nearby stove

mood: intense concentration, professional artistry, controlled chaos

environment: professional kitchen with stainless steel surfaces, white tile walls, copper cookware, mise en place containers

camera: shot on 85mm lens, f1.4 shallow depth of field, low angle from plate level looking up at chef’s hands and face, background kitchen activity rendered in creamy bokeh, macro close-up of the plating action with hands in sharp focus

color: warm amber kitchen lights, cool stainless steel, vibrant green microgreens, white porcelain plate

textures: glossy sauce on plate, crisp microgreens, brushed stainless steel, chef’s weathered hands

composition: plate positioned in lower third, chef’s hands and tweezers as focal point in center, face partially visible in upper third, background kitchen compressed by telephoto lens

style: editorial food photography, cinematic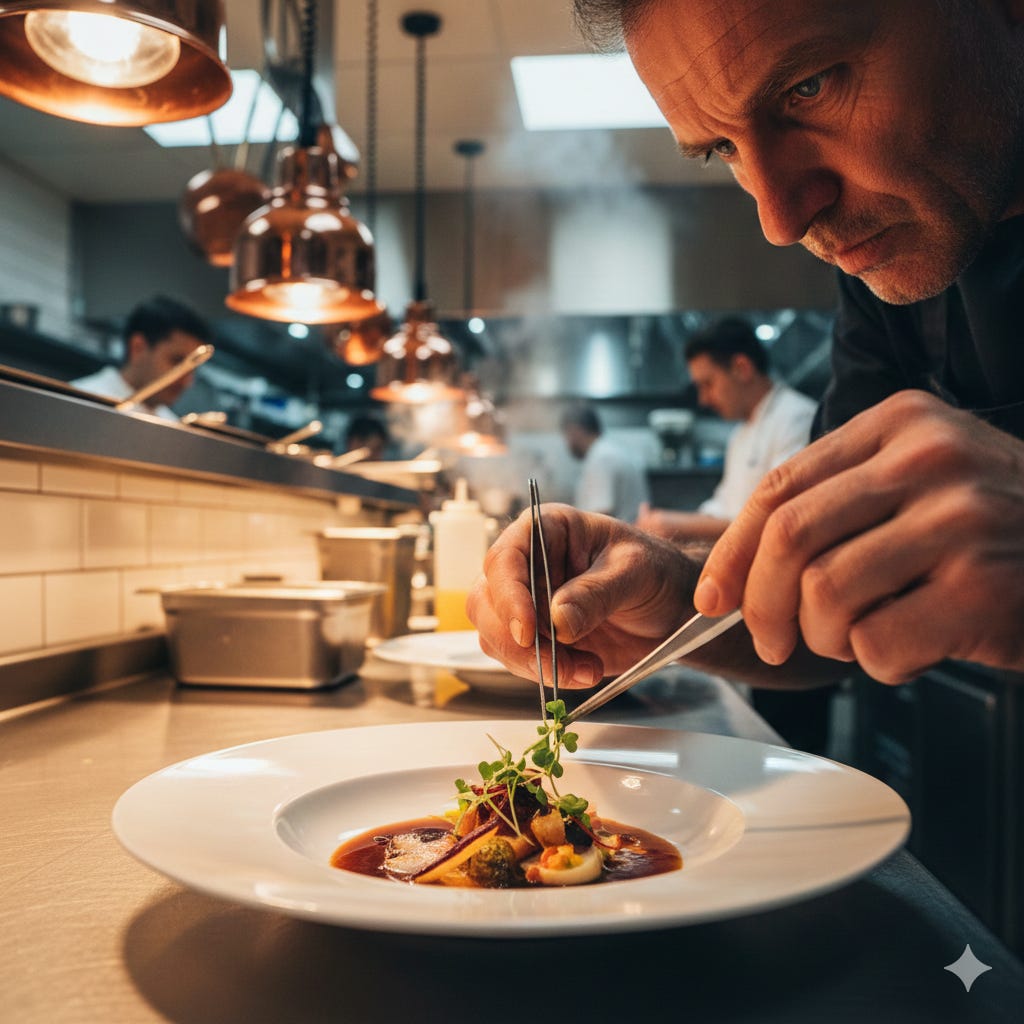
Notice how the camera specifications completely transform the shot?
The 85mm telephoto lens compresses the background, the f1.4 aperture creates that shallow depth of field with beautiful bokeh, and the low angle from plate level gives a unique perspective.
These technical details dramatically change how the scene feels compared to a generic “overhead shot” or “wide angle.”
Step 5: Style and quality
Once content and camera are clear, add style and fidelity:
Style: “photorealistic”, “studio portrait”, “digital painting”, “oil painting”, “isometric illustration”, “comic book panel”
Era/medium: “1980s film still”, “Polaroid photograph”, “concept art”, “anime frame”
Quality hints (minimal, no spam): “high-resolution”, “cinematic”, “8k render look”
Here are examples for each detail bucket:
Style options:
Photorealistic: Looks like a real photograph
Studio portrait: Professional photo shoot with controlled lighting
Digital painting: Created digitally with painterly brush strokes
Oil painting: Traditional canvas painting texture and look
Isometric illustration: 3D-style diagram viewed from an angled top-down perspective
Comic book panel: Graphic novel style with bold lines and dramatic angles
Era/medium options:
1980s film still: Retro movie look with film grain and period lighting
Polaroid photograph: Vintage instant photo with soft focus and faded colors
Concept art: Polished illustration used in game or film production
Anime frame: Japanese animation style with characteristic cell-shading
Quality hints:
High-resolution: Sharp, detailed output
Cinematic: Movie-quality look with professional framing
8k render look: Ultra-high detail and clarity
Keep these minimal. Nano Banana Pro understands natural language well without needing repetitive quality spam.
Example for Step 5
Here’s a prompt demonstrating Step 5 with a 1980s film style change:
A detective interrogating a suspect in a dimly lit police station

A hard-boiled detective in a rumpled suit leaning over a metal table, cigarette smoke curling upward, facing a nervous suspect in handcuffs, institutional green walls with peeling paint, a single hanging bulb overhead

style: 1980s crime thriller film still, shot on Kodak film stock with natural grain, practical lighting only, slight color shift.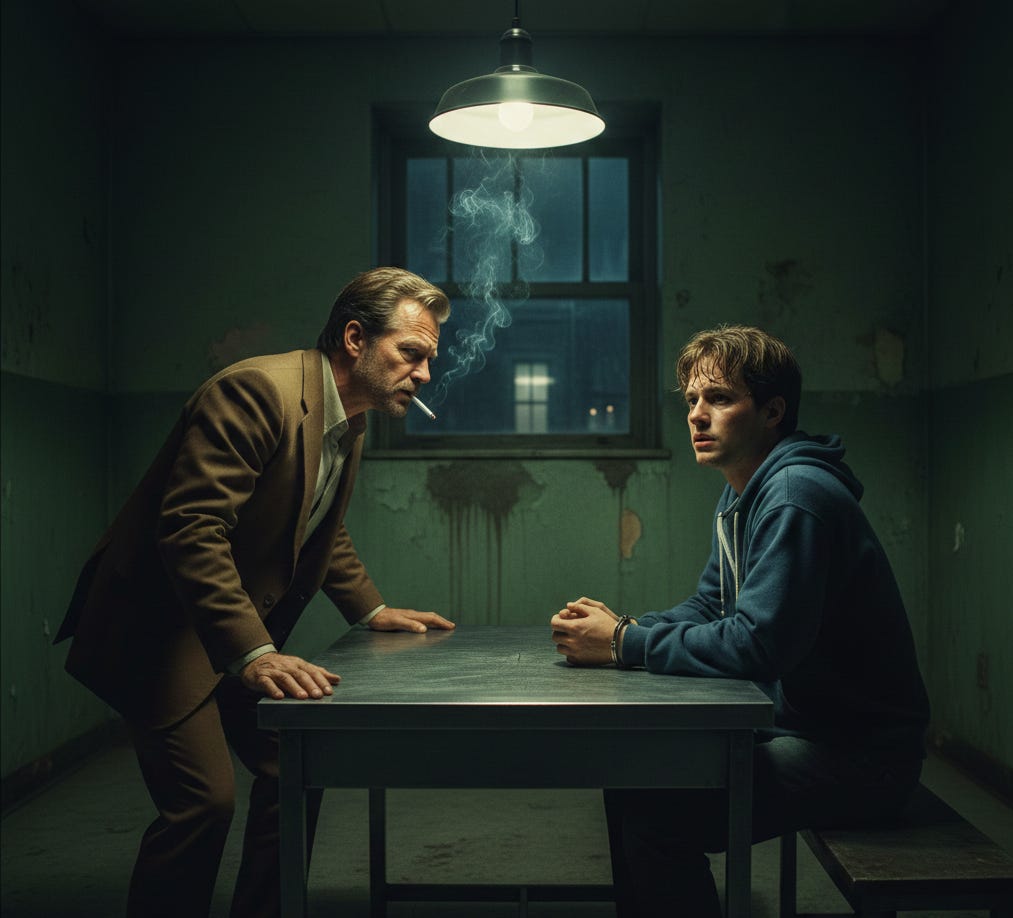
Notice how the style specification completely transforms the aesthetic.
The 1980s film look adds grain, specific color grading, halation, and that distinctive practical lighting approach that defined the era’s cinematography.
Step 6: Text rendering and layout
One of Nano Banana Pro’s superpowers is accurate text and structured layouts, so be explicit:
Specify exact text: “The headline ‘SOLOPRENEUR CODE’ at the top”
Font: “bold, white, sans-serif font”
Placement: “centered at the top”, “small caption in lower-left corner”
Use case: “poster layout”, “infographic with title, three columns, and icons”, “app UI mockup with header, sidebar, and main content card”
Clear text and layout instructions are critical for posters, UIs, dashboards, and diagrams.
Example for Step 6
Here’s a prompt demonstrating Step 6 with a 1980s sci-fi aesthetic and strong text/layout focus:
A retro computer terminal display in a dimly lit underground control room

A vintage CRT monitor showing system diagnostics and warning messages, surrounded by blinking indicator lights and analog switches, dust particles floating in shaft of light from ventilation grate above

text: The CRT screen displays ‘SYSTEM ALERT’ in bright green monospace font at the top, followed by three lines of diagnostic text reading ‘CORE TEMP: 94°C’, ‘PRESSURE: CRITICAL’, and ‘MANUAL OVERRIDE REQUIRED’, small blinking cursor at bottom left. A weathered label above the monitor reads ‘TERMINAL 7-B’ in stenciled military typography

style: 1980s sci-fi film aesthetic like Alien or WarGames, shot on film stock with natural grain, practical effects only, authentic period technology, color grading characteristic of early 1980s cinematography with slightly desaturated look

surface: cinematic still frame, 16:9 aspect ratio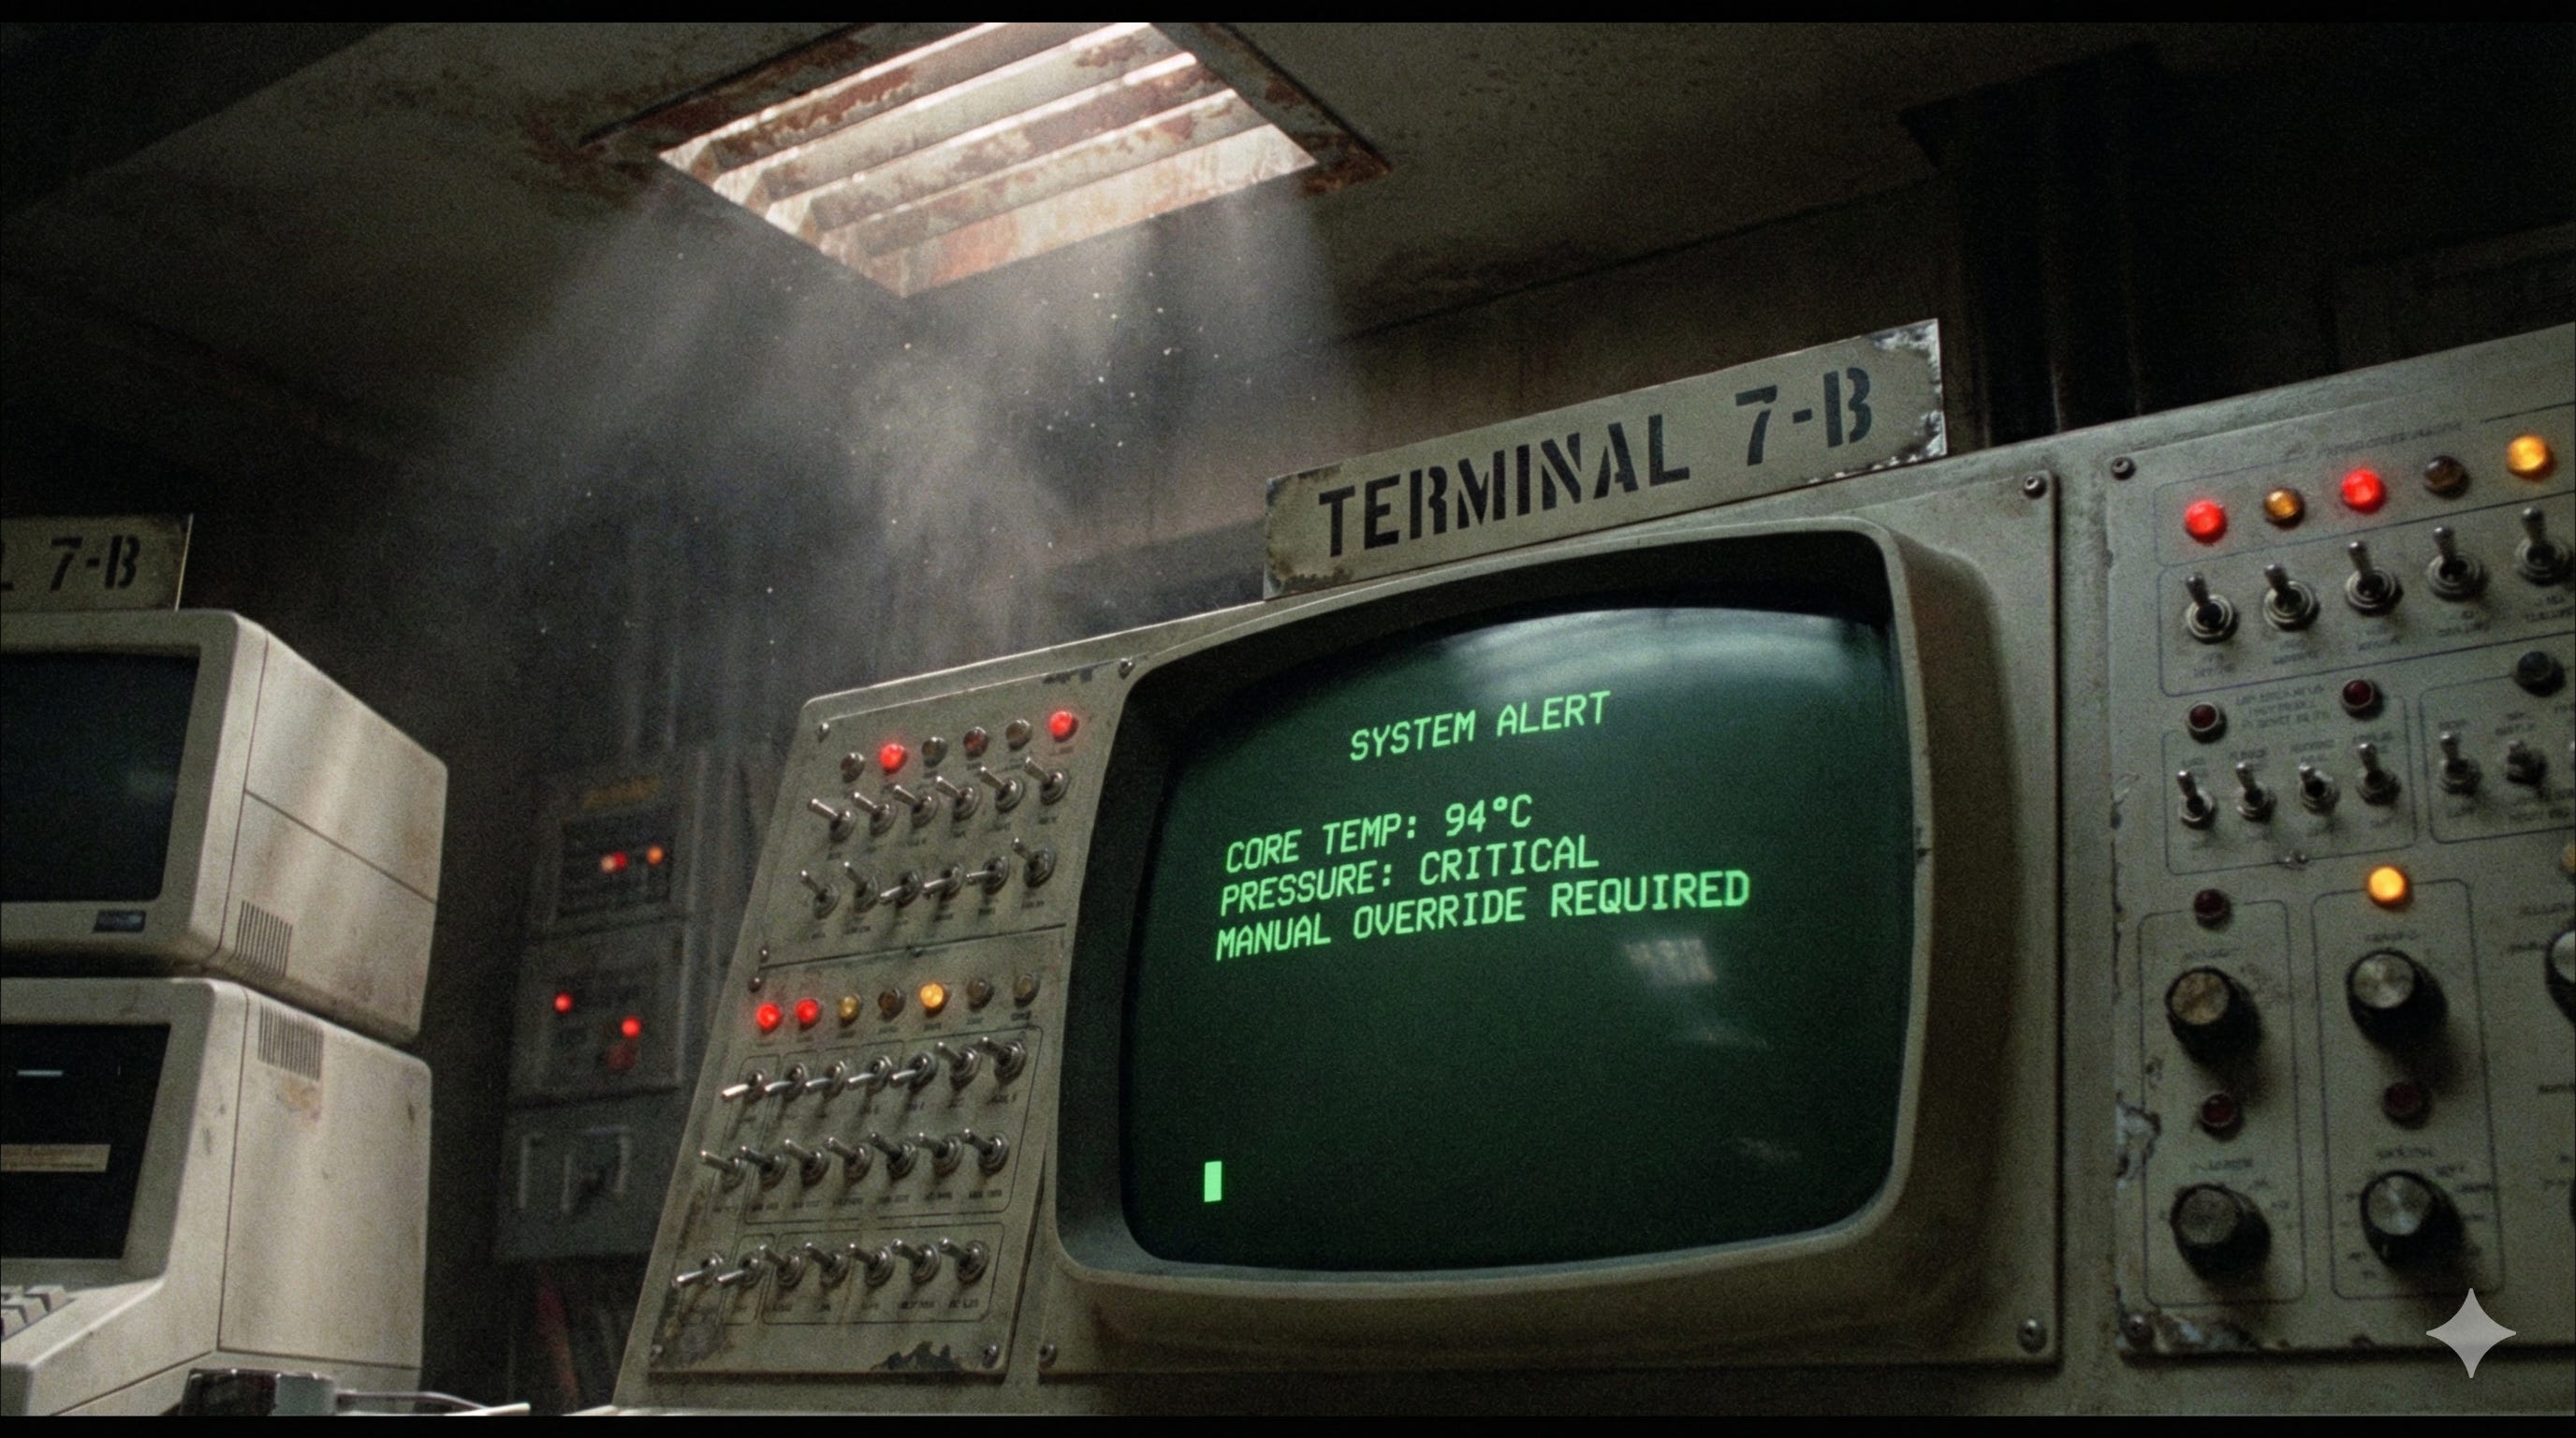
Notice how the text specifications are explicit about exact wording, font characteristics (monospace, stenciled), placement (top, bottom left, above monitor), and even behavior (blinking cursor)
This level of detail is what makes Nano Banana Pro’s text rendering capabilities shine.
Step 7: Reference images and consistency
Nano Banana Pro can use multiple reference images to keep characters, products, and style consistent across outputs.
Brand kits (logos, colors, layouts)
Characters (same face, outfit, and pose variations)
Product lines (same bottle/device in multiple scenes)
Workflow:
Upload reference images (character sheets, logo, previous shots).
In your prompt, say: “Use the uploaded logo as a strict brand reference on the sign” or “Keep the main character from Image 1 but put them in the pose from Image 2.”
This unlocks campaigns, storyboards, and multi-image sets that actually match.
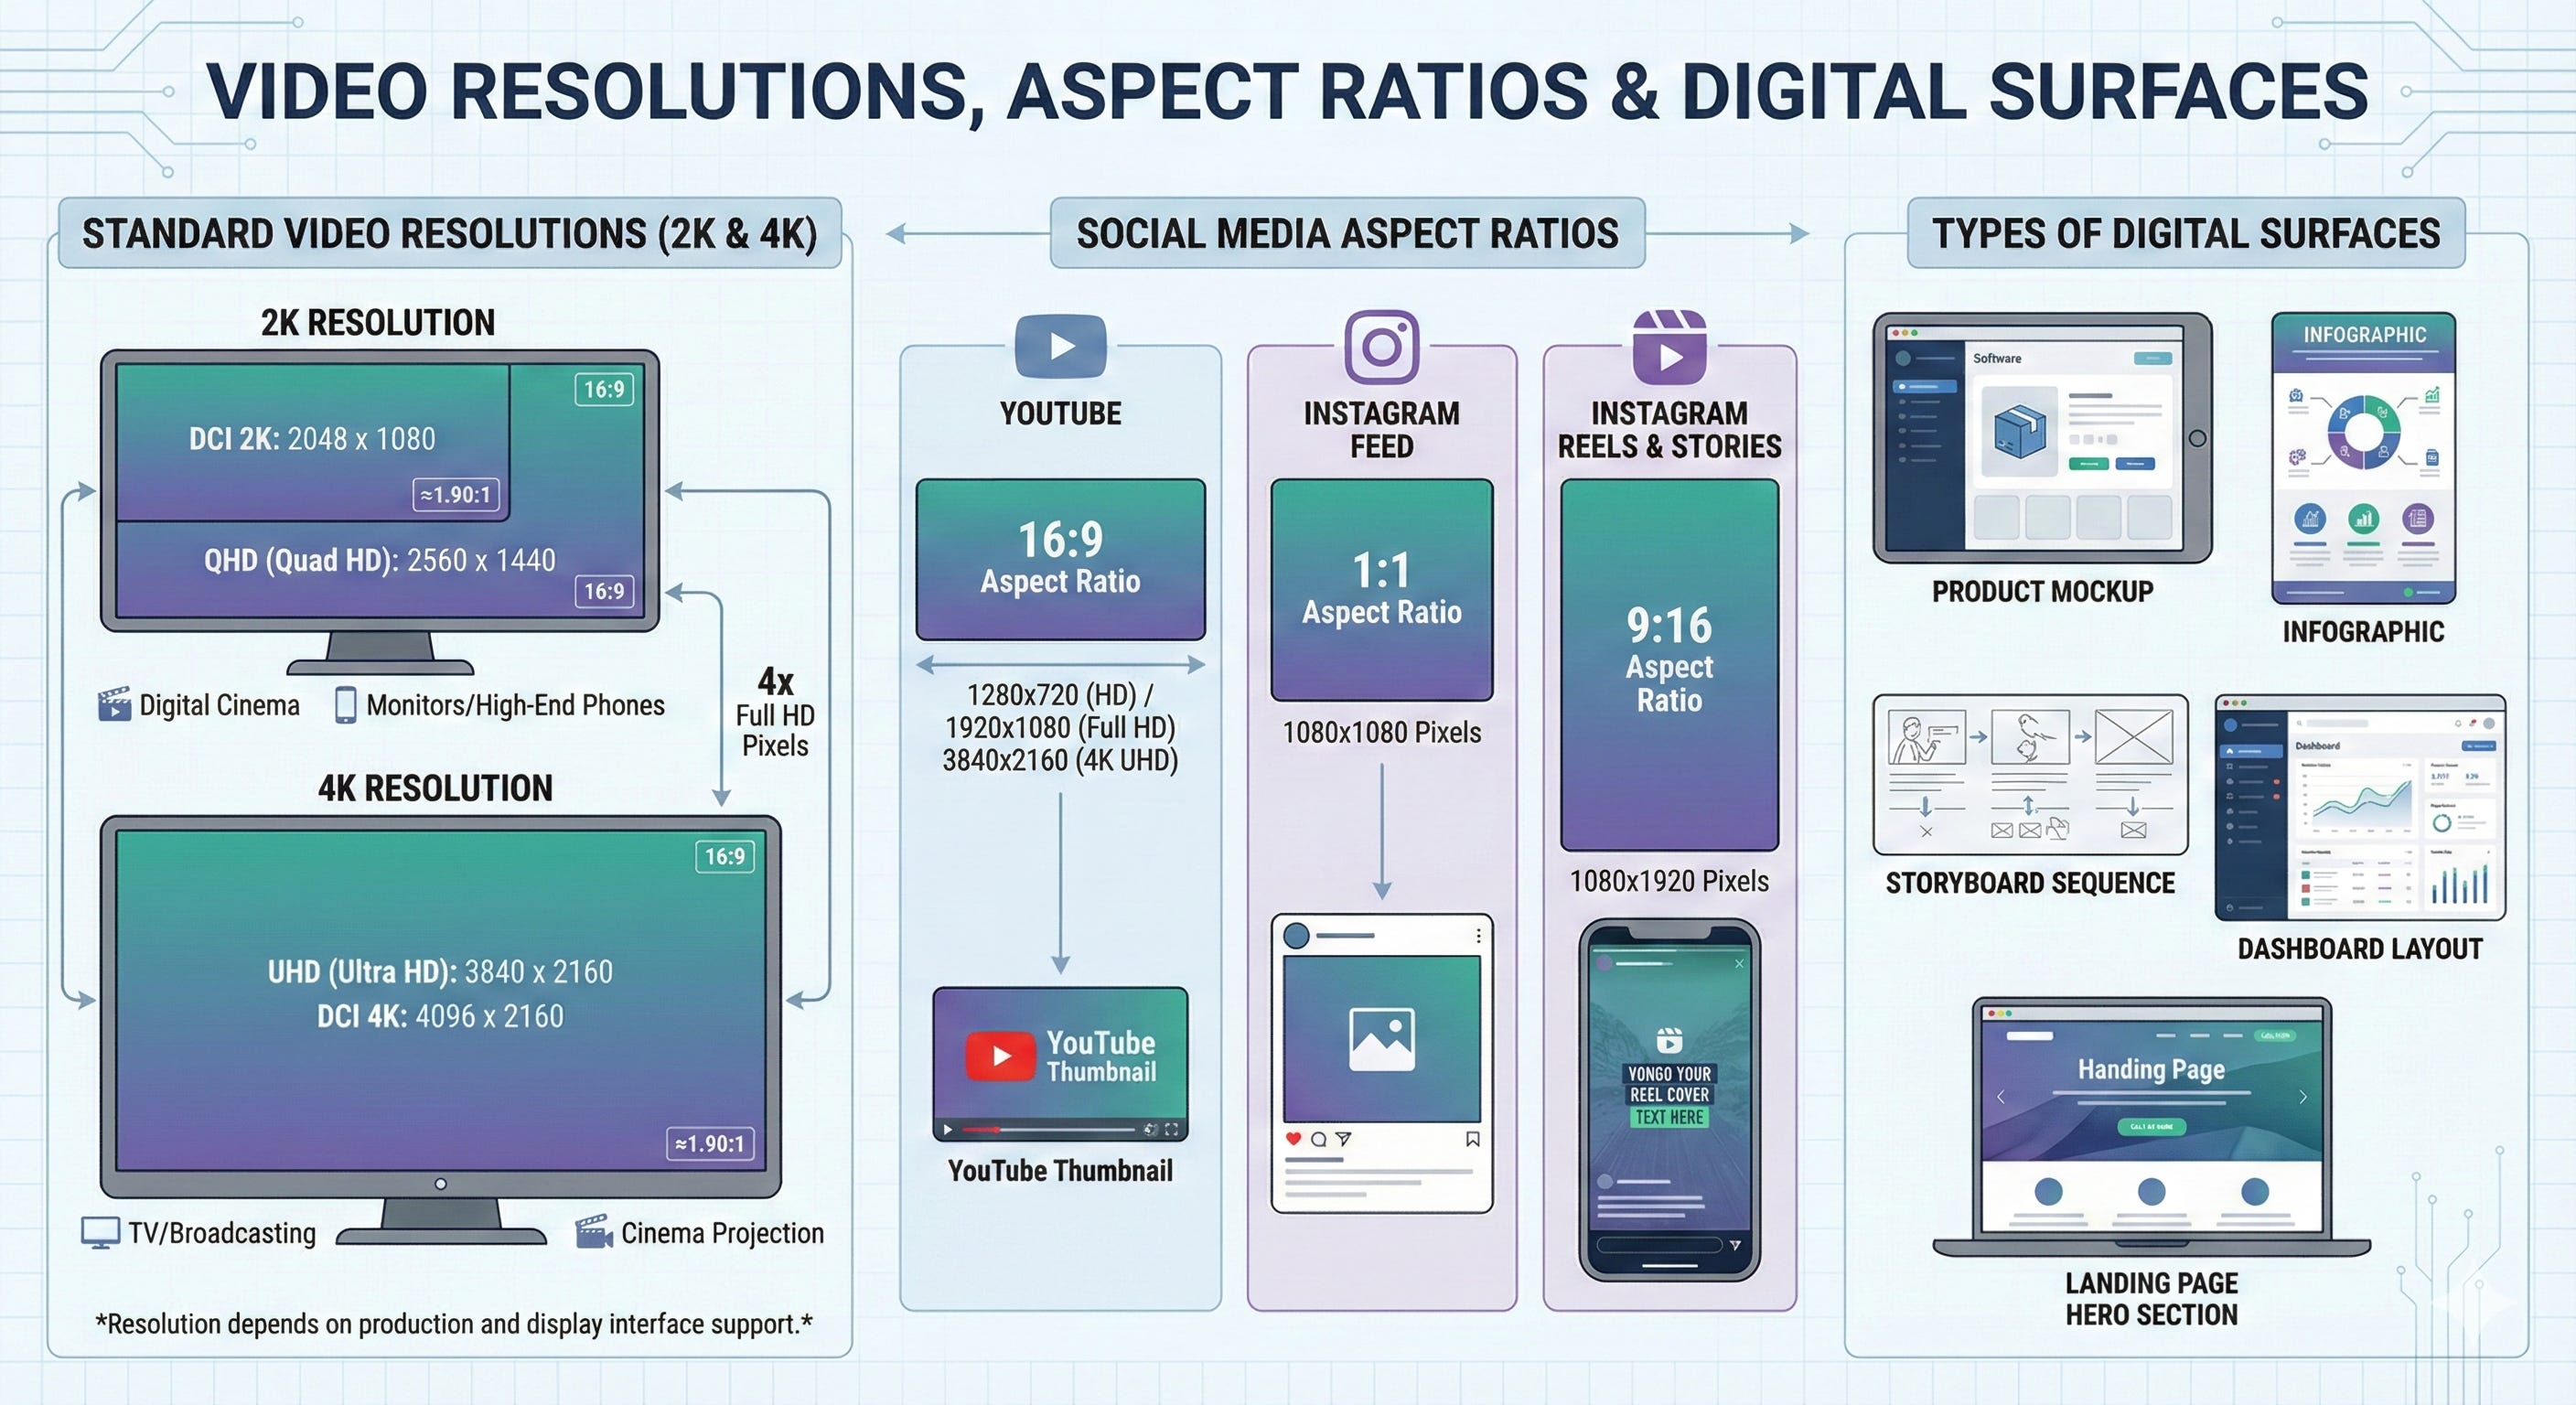
Step 8: Aspect ratio, resolution, and surfaces
Tell Nano Banana Pro what surface you’re designing for and how it should look:
Aspect ratio: “16:9 YouTube thumbnail”, “1:1 Instagram feed”, “9:16 vertical reel cover”
Resolution: “2K” or “4K” when supported in your interface for production use.scalevise+1
Surface: “product mockup”, “infographic”, “storyboard sequence”, “dashboard layout”, “landing page hero section”
Framing the output as a specific surface pushes the model to think in structured components, not just vibes.
Step 9: Edit, iterate, and localize
Use conversational editing to refine instead of regenerating from scratch:
Local edits: “Darken only the background”, “replace the mug with a glass teapot”, “make the neon sign say ‘SOLOPRENEUR’ instead.”
Style shifts: “keep composition and text the same but render in painterly watercolor style”
Localization: “Translate all text into Japanese, keep layout identical, use appropriate local typography.”
Iterate like a designer giving revision notes, one constraint at a time.
Nano Banana Pro is extremely consistent with this.
The “Perfect Prompt” template
You can turn the thread into a single reusable template:
a [core idea], [who/what/where with 1–2 clauses]

lighting: [lighting description]

mood: [emotional tone]

environment: [key objects and setting details]

camera: [lens, angle, depth of field, shot type]

color: [dominant palette]

textures: [how materials feel/look]

composition: [framing and rule-of-thirds notes]

style: [photographic/illustration style, era, medium]

text: [exact words, font style, placement, language]

surface: [poster/infographic/UI/dashboard/storyboard]

aspect ratio & resolution: [e.g., 16:9, 4K]
Filling in this template forces you to think in layers
idea → context → buckets → camera → style → text → surface
Which is exactly how to use more than “1 percent” of Nano Banana Pro’s capabilities.
Secret sauce! Reverse engineer any image
Here’s a technique that multiplies your prompting power: upload an image you love and ask Gemini to describe it using the template structure above.
How it works
Upload any image with compelling lighting, composition, or style.
Then prompt Gemini
Analyze this image and create a detailed description following this structure: core idea, who/what/where, lighting, mood, environment, camera, color, textures, composition, and style.Gemini will reverse engineer the visual elements and give you a structured breakdown.
You can then feed that description directly into Nano Banana Pro to recreate similar aesthetics, or modify specific buckets to create variations.
Why this is powerful
Instead of struggling to articulate what makes an image work, you let Gemini do the visual analysis.
This builds your prompting vocabulary fast and gives you a library of proven formulas.
Save these descriptions as templates for different visual styles you want to master.
This technique bridges the gap between “I like this” and “I can create this.”
Upload a favorite movie still, product shot, or illustration, get the structured breakdown, and you have an instant prompt template that captures exactly what works.
Not a paid member yet?
Upgrade to paid access now to unlock the Premium Vault, join monthly live trainings, and get access to the AI Toolbox and Action Lab.
Want to read more about the FULL benefits of being a Paid Subscriber?


‘How could anyone not love Nano Banana? - Nvidia CEO Jensen Huang
Let’s crack the growth equation and build a thriving one-person business on your terms!
Anfernee